-
TRANSDUCERS
- TRANSDUCERS
-
BASIC COMPONENTS DK
- BASIC COMPONENTS DK
-
MARKETPLACE
- MARKETPLACE
-
DEVELOPMENT BOARDS & KITS
- DEVELOPMENT BOARDS & KITS
-
CABLE ASSEMBLIES
- CABLE ASSEMBLIES
-
RF AND WIRELESS
- RF AND WIRELESS
-
BOXES ENCLOSURES RACKS
- BOXES ENCLOSURES RACKS
-
AUDIO PRODUCTS
- AUDIO PRODUCTS
-
ARTILA
- ARTILA
-
FANS-BLOWERS-THERMAL MANAGEMENT
- FANS-BLOWERS-THERMAL MANAGEMENT
-
WIRELESS MODULES
- WIRELESS MODULES
-
TERMINALS
- TERMINALS
-
Cables/Wires
- Cables/Wires
-
SINGLE BOARD COMPUTER
- SINGLE BOARD COMPUTER
-
BREAKOUT BOARDS
- BREAKOUT BOARDS
-
LED
- LED
-
TEST AND MEASUREMENT
- TEST AND MEASUREMENT
-
POTENTIONMETERS AND VARIABLE RESISTORS
- POTENTIONMETERS AND VARIABLE RESISTORS
-
DEVELOPMENT BOARDS AND IC's
- DEVELOPMENT BOARDS AND IC's
-
EMBEDDED COMPUTERS
- EMBEDDED COMPUTERS
-
OPTOELECTRONICS
- OPTOELECTRONICS
-
INDUSTRAL AUTOMATION AND CONTROL
- INDUSTRAL AUTOMATION AND CONTROL
-
COMPUTER EQUIPMENT
- COMPUTER EQUIPMENT
-
CONNECTORS & INTERCONNECTS
- CONNECTORS & INTERCONNECTS
-
MAKER/DIY EDUCATIONAL
- MAKER/DIY EDUCATIONAL
-
TOOLS
- TOOLS
-
MOTORS/ACTUATORS/SOLEENOIDS/DRIVERS
- MOTORS/ACTUATORS/SOLEENOIDS/DRIVERS
-
FPGA HARDWARE
- FPGA HARDWARE
-
POWER SUPPLIES
- POWER SUPPLIES
-
ROBOTICS & AUTOMATION
- ROBOTICS & AUTOMATION
Description
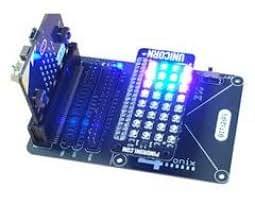
Bit:2:Pi Allows the BBC Micro:Bit to Connect to Raspberry Pi Addon Boards
The Bit:2:Pi enables you to re-use all those hundreds of Raspberry Pi addon boards and HATs.
Simply plug your micro:bit into the edge connector and the required Raspberry Pi Hat onto the GPIO connector, then program your micro:bit to control the new board. Most Raspberry Pi boards are very simple to program as they are controlled by simple on/off signals on the GPIO connector which are easily copied in the Micro:Bit. 4tronix have also used Neopixel hats (eg. Unicorn pHAT) with great success and are happily communicating via I2C as well.
Select which micro:bit pin is connected to which GPIO pin via a set of configurable jumpers. There is a default set of connections that works for the most common boards, including I2C and SPI connections, but it is a simple matter to unplug a jumper or two, and replace it with a longer wire jumper (4 included) to connect your preferred pins.
Of course, the original code for the Raspberry Pi won't run directly on the micro:bit but with support from our community we will get more and more boards working and with example microbit code.
Current boards tested include:
- 4tronix: PlayHat, Picon Zero, PiStop, motor controllers
- Pimoroni: Unicorn pHAT/HAT. Explorer, Enviro pHAT, Blinkt!, Scroll pHAT
Power is supplied to the board and the micro:bit via the micro-USB connector on the side, but there is also an option to add a battery holder to allow completely wire-free operation.
Note:NB. BBC Micro:Bit is NOT included
TT-FLK-3462Bit:2:Pi
SIZE GUIDE
- Shipping in 10-12 Working days
- http://cdn.storehippo.com/s/59c9e4669bd3e7c70c5f5e6c/ms.products/5dfb0665a9672805c00c983a/images/5dfb06e2a9672805c00ca7fb/5dfb06c69fc0fc3b5fea0d74/5dfb06c69fc0fc3b5fea0d74.jpg
Description of product
Description
Bit:2:Pi Allows the BBC Micro:Bit to Connect to Raspberry Pi Addon Boards
The Bit:2:Pi enables you to re-use all those hundreds of Raspberry Pi addon boards and HATs.
Simply plug your micro:bit into the edge connector and the required Raspberry Pi Hat onto the GPIO connector, then program your micro:bit to control the new board. Most Raspberry Pi boards are very simple to program as they are controlled by simple on/off signals on the GPIO connector which are easily copied in the Micro:Bit. 4tronix have also used Neopixel hats (eg. Unicorn pHAT) with great success and are happily communicating via I2C as well.
Select which micro:bit pin is connected to which GPIO pin via a set of configurable jumpers. There is a default set of connections that works for the most common boards, including I2C and SPI connections, but it is a simple matter to unplug a jumper or two, and replace it with a longer wire jumper (4 included) to connect your preferred pins.
Of course, the original code for the Raspberry Pi won't run directly on the micro:bit but with support from our community we will get more and more boards working and with example microbit code.
Current boards tested include:
- 4tronix: PlayHat, Picon Zero, PiStop, motor controllers
- Pimoroni: Unicorn pHAT/HAT. Explorer, Enviro pHAT, Blinkt!, Scroll pHAT
Power is supplied to the board and the micro:bit via the micro-USB connector on the side, but there is also an option to add a battery holder to allow completely wire-free operation.
Note:NB. BBC Micro:Bit is NOT included
NEWSLETTER
Subscribe to get Email Updates!
Thanks for subscribe.
Your response has been recorded.
INFORMATION
ACCOUNT
ADDRESS
Tenet Technetronics# 2514/U, 7th 'A' Main Road, Opp. to BBMP Swimming Pool, Hampinagar, Vijayanagar 2nd Stage.
Bangalore
Karnataka - 560104
IN
Tenet Technetronics focuses on “Simplifying Technology for Life” and has been striving to deliver the same from the day of its inception since 2007. Founded by young set of graduates with guidance from ardent professionals and academicians the company focuses on delivering high quality products to its customers at the right cost considering the support and lifelong engagement with customers. “We don’t believe in a sell and forget model “and concentrate and building relationships with customers that accelerates, enhances as well as provides excellence in their next exciting project.


